ESP32 for Arduino 学习笔记(电容触摸与霍尔传感器篇)
一、前言
ESP32 是一款很强大的开发板,在 Arduino 环境下能轻松实现各类传感器功能。这次咱们重点学习 电容触摸传感器 和 霍尔传感器 的使用,用简单代码和清晰注释,让咱中学生能轻松看懂、学会 。
二、电容触摸传感器
(一)基本原理
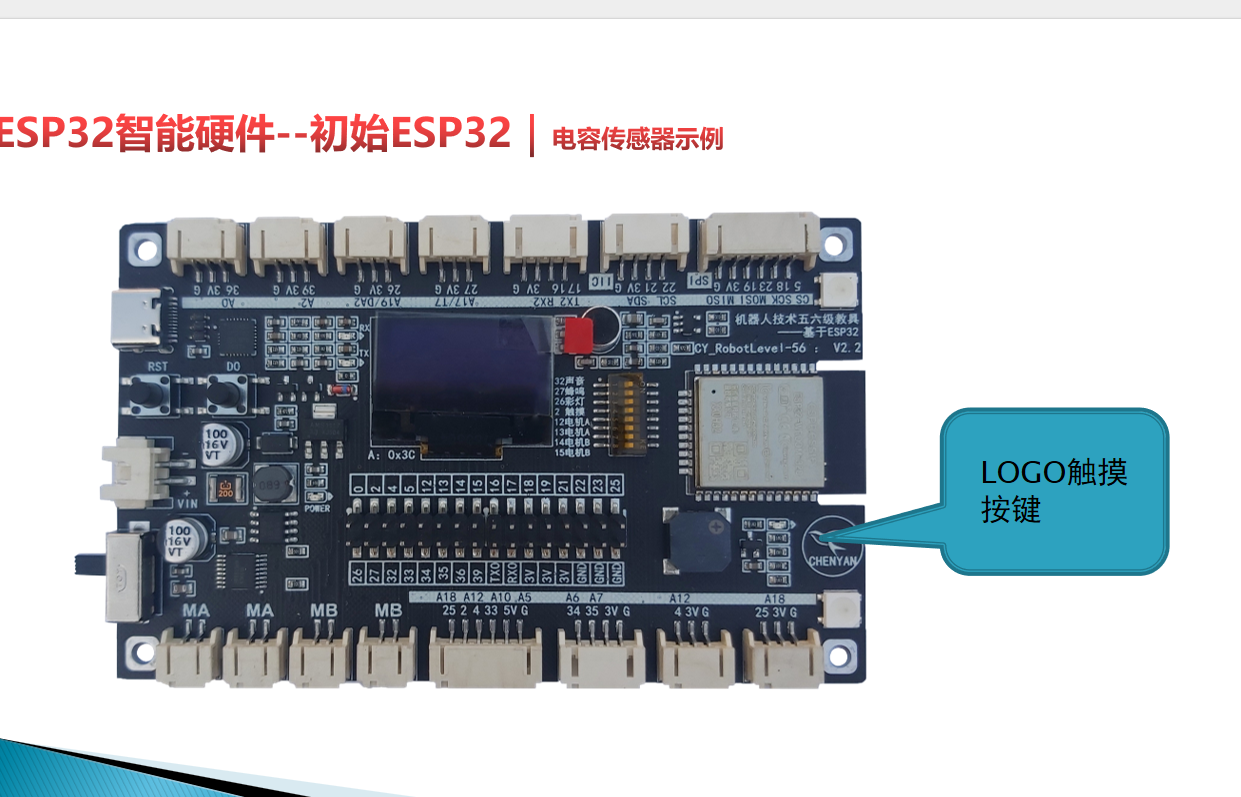
ESP32 的电容触摸传感器,靠检测人体触碰引脚时的电容变化工作。当手碰到对应引脚,引脚电容改变,程序能读到变化值,实现触摸感应功能,像做触摸开关、互动装置超方便 。
(二)核心函数
touchRead(pin)- 功能:读取指定触摸引脚的电容值,触摸时返回值会变小,范围
0~255。 - 参数:
pin是触摸引脚,ESP32 有 T0、T2~T9 等(对应 4、2、15 等物理引脚,拓展板可用引脚有特殊限制 )。 - 示例:
- 功能:读取指定触摸引脚的电容值,触摸时返回值会变小,范围
// 读 T0 引脚触摸值,串口打印
void setup() {
  Serial.begin(115200);
}
void loop() {
  int touchVal = touchRead(T0);
  Serial.println(touchVal);
  delay(20);
}
touchAttachInterrupt(pin, TSR, threshold)- 功能:设置触摸中断 。引脚返回值低于
threshold(阈值),自动调用TSR回调函数,实现触摸触发逻辑。 - 参数:
pin:触摸引脚(同touchRead的引脚规则 )。TSR:中断回调函数名,无参数、无返回值,触发时自动执行。threshold:触发阈值,低于它就执行回调。
- 示例(触摸触发打印提示 ):
- 功能:设置触摸中断 。引脚返回值低于
const int threshold = 40;       // 触发阈值
const int touchPin = T6;        // 用 T6 触摸引脚(对应 14 号物理引脚)
bool touchDetected = false;     // 触摸状态标记

// 中断回调函数,触发时设 touchDetected 为 true
void touchDoing() {
  touchDetected = true;
}

void setup() {
  Serial.begin(9600);
  // 绑定触摸中断:引脚 T6、回调 touchDoing、阈值 40
  touchAttachInterrupt(touchPin, touchDoing, threshold);
}

void loop() {
  int touchValue = touchRead(touchPin); // 读触摸值
  Serial.println("Value: " + String(touchValue));
  if (touchDetected) {         // 若检测到触摸
    touchDetected = false;     // 重置状态
    Serial.println("触摸传感器已触发");
  }
  delay(2000);
}
(三)实操案例:触摸控制 LED(简单版 + 中断版 )
- 简单版(轮询检测 )
需求:触摸 T2 引脚(假设对应物理引脚),控制 LED(接 25 脚)开关。
代码:
const int touchPin = T2;  // 触摸引脚
const int ledPin = 25;    // LED 引脚
int a;                    // 存触摸值
boolean t = false;        // 灯状态,false 灭、true 亮

void setup() {
  Serial.begin(115200);
  pinMode(ledPin, OUTPUT); // 设 LED 引脚为输出
}

void loop() {
  a = touchRead(touchPin); // 读触摸值
  if (a <= 30) {           // 触摸值低于 30 算触发
    t = !t;                // 翻转灯状态
    delay(1000);           // 消抖,避免重复触发
    Serial.print(a);
    Serial.print("-------");
    Serial.println(t);
  }
  digitalWrite(ledPin, t); // 控制 LED
  delay(20);               // 稍作延时
}
- 中断版(更灵敏,适合复杂逻辑 )
需求:用中断方式,触摸 T6 引脚触发 LED 状态切换。
代码:
const int threshold = 40;       // 触发阈值
const int touchPin = T6;        // 触摸引脚
const int ledPin = 25;          // LED 引脚
bool touchDetected = false;     // 触摸标记
boolean ledState = false;       // 灯状态

// 中断回调函数
void touchDoing() {
  touchDetected = true;
}

void setup() {
  Serial.begin(9600);
  pinMode(ledPin, OUTPUT);
  // 绑定触摸中断
  touchAttachInterrupt(touchPin, touchDoing, threshold);
}

void loop() {
  if (touchDetected) {         // 检测到触摸
    touchDetected = false;     // 重置标记
    ledState = !ledState;      // 翻转灯状态
    digitalWrite(ledPin, ledState);
    Serial.println("触摸触发,LED 状态切换");
  }
  delay(2000);
}
三、霍尔传感器
(一)基本原理
ESP32 内部集成霍尔传感器,利用 霍尔效应 检测磁场强度。靠近磁场南极(正极),返回正整数;靠近北极(负极),返回负整数。能做磁场检测、计数(比如检测磁铁经过次数 )、位置控制等。
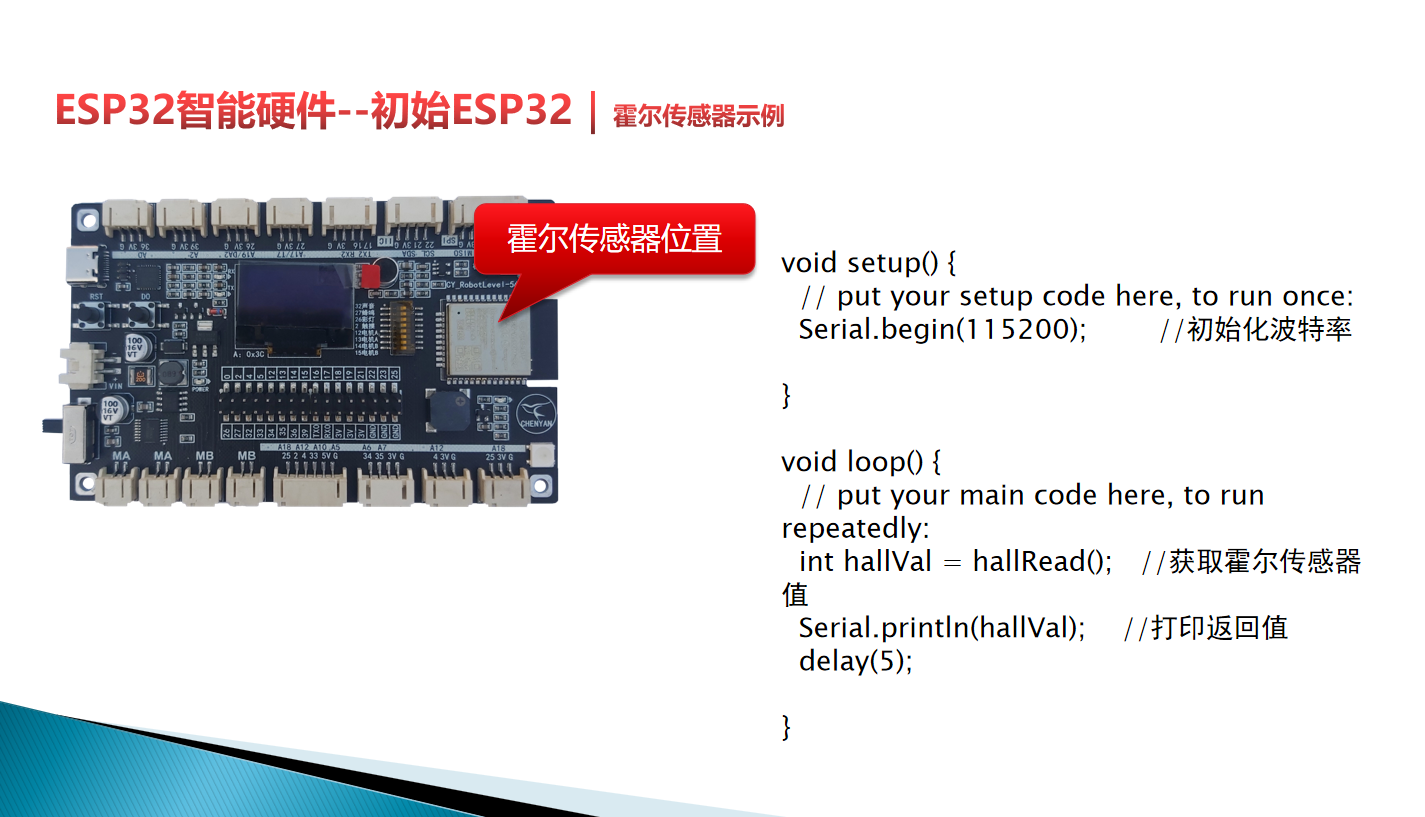
(二)核心函数:hallRead()
- 功能:读取当前磁场强度,无参数。
- 注意:调用时会占用 36、39 引脚,所以 A0、A3 不能当模拟输入用啦。
- 示例(串口打印磁场值 ):
void setup() {
  Serial.begin(115200); // 初始化串口
}

void loop() {
  int hallVal = hallRead(); // 读霍尔传感器值
  Serial.println(hallVal);  // 串口打印
  delay(50);                // 延时,稳定读数
}
(三)实操案例:磁场检测与简单计数
需求:用霍尔传感器检测磁场,磁铁靠近计数,串口打印磁场值和计数。
代码:
int count = 0;           // 计数变量
int lastHallVal = 0;     // 存上一次磁场值,判断磁场变化
const int threshold = 100; // 磁场变化阈值,超过算有效触发

void setup() {
  Serial.begin(115200);
}

void loop() {
  int hallVal = hallRead();
  Serial.println("磁场值:" + String(hallVal));

  // 简单判断磁场变化(比如磁铁靠近),这里逻辑可根据实际调
  if (abs(hallVal - lastHallVal) > threshold) {
    count++;
    Serial.println("检测到磁场变化,计数:" + String(count));
    delay(2000);
  }

  lastHallVal = hallVal; // 更新上一次值
  delay(100);            // 延时,避免频繁检测
}
四、总结
- 电容触摸传感器 :通过
touchRead轮询检测,或touchAttachInterrupt中断触发,实现触摸交互,适合做触摸开关、互动装置 。 - 霍尔传感器 :用
hallRead读磁场强度,能检测磁场极性、强度,拓展做计数、位置控制超好玩 。
这些代码和功能,大家多实操试试,改改参数、拓展功能(比如触摸控制复杂灯效,霍尔做门窗磁感应 ),就能慢慢掌握 ESP32 在 Arduino 里的玩法啦,加油~
1 条评论
-
admin SU @ 2025-7-5 15:09:28
- 1